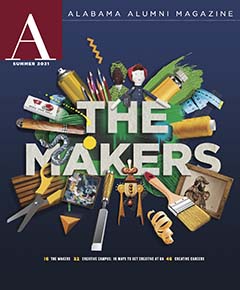
The Makers: These five artistic alumni have a talent in creating—and give tutorials on how to make projects of your own
By Kelley Freund
In a world that has become increasingly virtual, five crafty University of Alabama alumni are showing us the importance of making something real—something you can squeeze, like a doll, or something to make you laugh, like a book that tells a funny story. Something to sit on. Something to remember a loved one. Something to show you beauty in an unexpected object.
These alumni create for different reasons. Some do it to keep their hands busy, others to share their talents with friends or to make people smile. And they use a variety of materials in the process, from wood and fabric to paper (even toilet paper!). But while each creation is unique, they have one thing in common: They prove making matters.
Best of all, our alumni artisans are teaching you how to discover your inner craftiness and create these projects for yourself.
Paige Dorsey
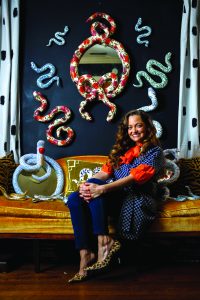
When Paige Dorsey, ’06, and her husband traveled to Thailand in 2011, she saw a piece of art at a hotel that stopped her in her tracks: a large, ornate mirror with two snakes intertwined around it. “I could not stop staring at it,” Dorsey said. “It was amazing to me that this artist took a snake, something that has been feared for millennia, and made it so beautiful.”
Even after the couple left Thailand, the image of the mirror stuck with Dorsey, and she wondered if she could make something similar.
For Dorsey, the desire to create is nothing new. With a background in interior design, she has made much of the decor in her home. A few years ago, when she saw an Instagram post from a London restaurant that had created an indoor garden by decking out the space with cherry blossoms, Dorsey set out to replicate the project. She studied the cherry tree in her side yard and discovered how delicate it was, almost like tissue. Her daughter, who was 1 at the time, had been constantly unrolling toilet paper, and Dorsey realized she could make the cherry blossoms from the scraps. Today, she has her own indoor cherry blossom garden in the front room of her house.
“Some people see something in a store, and they want to have it,” Dorsey said. “Others want to be the person who makes it. I want to make the beautiful things that other people want! That’s where I find my joy—not the possession of these objects, but the creation of them.”
When the pandemic hit, Dorsey decided she was finally going to figure out how to make a version of the snake mirror she had long admired. After trying different techniques, from woodworking to paper mâché, she settled on creating the snake from a mixed media that mimics porcelain. After sharing her creation on Instagram and realizing how many people loved it, she decided to start selling them, first through Instagram, then on Chairish, a marketplace for furniture, decor and art. Customers often purchase a blank snake that Dorsey will custom paint. However one of her most popular collections has a blue and white pattern inspired by her grandmother’s china—these usually sell out in 30 minutes on Instagram.
“Before, when I made things, I felt like I was always in control of what I did,” Dorsey said. “But when I started doing this project, it was like I was simply the vessel from which these ideas had to come into this life. I love that my daughters get to see me doing something that no one else is. I’m showing them to be open-minded to anything that comes their way. Even if you think it’s crazy, try it because you never know.”
Paige’s Cherry Blossoms
Materials:
toilet paper
scissors
burgundy marker
hot glue gun
branch
Steps:
David Patterson
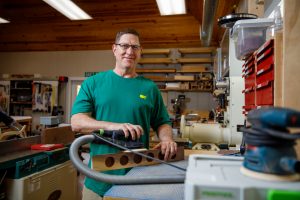
A chance conversation while sitting in a barber’s chair 15 years ago led David Patterson, ’83, to find a new hobby. Patterson, who was an assistant coach with the University’s gymnastics program for more than 35 years, mentioned that he thought he wanted to try woodworking but didn’t want to put all the money into purchasing tools only to discover he didn’t like it. When his barber told him a friend ran a woodworking co-op in town, Patterson decided to sign up.
Turns out, he loved his new hobby. He gradually bought new tools and wood, and today he spends his time crafting everything from coffee tables and pens (which he often gives as gifts to UA gymnastics alums) to wine stoppers and fishing rods.
But Patterson isn’t trying to make money off his creations. “I see things in a magazine or in a store, and I think, ‘I can try that,’” he said. “Maybe my wife or my daughters would like it. Most of what I make goes to friends and family, or to fundraisers for charities. Occasionally I’ll be contracted to make a table for somebody, but I have to know them really well to do that.”
Patterson prefers to work with materials that have meaning, and he owns several wood collections, which he purchased at the estate sales of acquaintances who have passed. One collection is particularly special, as it was given to him by a close friend who collected wood from all over the world—the collection contains 50 different species from Australia. His appreciation for wood led Patterson to start a program at the University. If a tree on campus dies or blows down in a storm, the school works with Patterson to get that wood into the hands of craftspeople.
Last year, Patterson tried a new project: a pair of rocking chairs. “It was totally different because you have to bend the wood,” he said. “So far, it’s been the most complex thing I’ve ever done. But it turned out well. At least it didn’t break when I sat in it.”
Over the next few years, Patterson, who is an avid fly fisher and has caught a fish in every state, plans to experiment with his fishing poles. He currently builds rods out of bamboo but wants to try to create wooden ones.
“I’ve spent my whole career as a coach, and it’s a bit different to work with an inanimate object,” Patterson said. “When something screws up, I can only look to myself, but I’m OK with that. I’ve enjoyed the process of creating, and seeing something go from my imagination to something solid.”
David’s Cutting Board
Materials:
wood
water-resistant wood glue
planer or sander
mineral oil
Steps:
Lizzy Nichols
Lizzy Nichols, ’20, always had an interest in wood art, but in 2016, when she made her first visit to the Kentuck Festival of the Arts in Northport, Alabama, she met someone who helped turn that interest into a hobby and, eventually, a career.
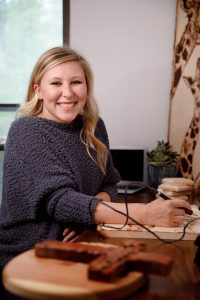
His name was Mr. Ed, and he had a woodshop in Tuscaloosa. Nichols asked if she could come to his shop to learn, and the following week, he was teaching her pyrography, a technique where a heated metal pen is used to burn wood, leaving behind a pattern. “I could always draw, but he told me it was different than drawing, and he joked that he wasn’t sure he wanted me to use his equipment,” Nichols said. “But I caught on quick. I think because I’ve always been artistic, I had a natural gift.”
Today, Nichols sells her work as a side hustle, earning commissions through social media and word of mouth. Customers usually ask her to create portraits of loved ones who have passed on, but she has also been asked to do pet portraits and scenic pieces. “It’s always special to do this for other people, especially for those who have lost somebody,” Nichols said. “Seeing their reactions and knowing how much my work means to them is very rewarding.”
She also says there is something soothing and satisfying about watching the wood burn. For some projects, Nichols enjoys working with cedar, not only because it burns smoothly, but because it smells good. However, it can be pricey, so she uses plywood for most of her commissions. Her smaller 8×8 inch pieces might take her an hour and a half, but larger ones can take up to four hours. Nichols focuses mostly on commissions because she doesn’t have the storage to wait around for someone to buy a piece. Recently she created one of her biggest projects, and it was one she designed herself: a mother and baby giraffe on a slab of wood almost as tall as she is.
This project was especially meaningful, as Nichols and her husband are expecting their first child in June. Once their son arrives, Nichols will go full time with her business. “This has been therapy for me, as well as a way to make money,” Nichols says. “I feel blessed I’ll be able to make a career out of this and enjoy what I do.”
Lizzy’s Twig Flowerpot
“When I was younger, my dad used to tell me to ‘go pick up sticks’ whenever I was bored. To those of you seeking an easy way to defeat boredom while creating something beautiful from your own backyard, this is a project for you!” – Lizzy Nichols
Materials:
twigs
container for flowers: Mason jar, small flowerpot, cup, etc.
yarn or string
flowers
Steps:
Amy Pirkle
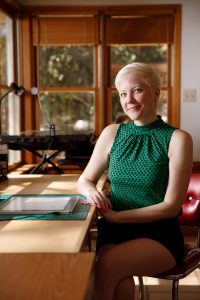
As a student at the University of Alabama, Amy Pirkle, MFA ’07, studied letterpress printing and book binding and is now an instructor at her alma mater. But what really got her excited was researching experimental book structures and even trying to create some on her own. After graduating, when she put her degree to use doing fine press work, she felt something was missing.
“I’ve always liked to draw from a very young age,” Pirkle says. “But as I got older, I felt this pressure to make serious work that would stand out in a gallery or be thought-provoking. I felt like I lost the joy of creating.”
The opportunity to get that joy back came along thanks to a Valentine’s Day tradition Pirkle shares with her husband, Jamey Grimes, who teaches in the University’s department of art and art history. The couple makes homemade Valentines each year, with Pirkle making Grimes different books, similar to ones she had explored as a UA student. One year, she made a flipbook, and when she shared her work on Instagram, her account blew up. When her second one was also successful, she went to Michael’s for a cheap lightbox and began creating more.
Today, Pirkle has worked with a variety of corporate clients to create flipbooks, including the American Red Cross, Callaway Golf, the BBC, McDonald’s and Amazon Prime. She is also an instructor for Craftsy, where she teaches a flipbook animation course called FLIP OUT!
When Pirkle’s not working on commissions, she comes up with her own creations, including two series that feature the same characters. The first character series she created is about two peas in a pod—which was inspired by the fact that Pirkle is an identical twin. “I lean towards cute when I do flipbooks for fun,” said Pirkle. “My target demographic is young women, about ages 13–24. That’s who I think of when I’m making these flipbooks. What would I have wanted to see at that age? That being said, I think people of all ages can relate.”
That’s certainly the case with her second character series, which features a ghost and a pumpkin. The characters started as a simple Halloween story, but grew into a lovable, humorous series about two friends. Pirkle doesn’t gender the characters in her flipbooks, and she uses gender-neutral pronouns for ghost and pumpkin so that viewers can project themselves onto either character. Recently, she created a book where the pumpkin misses their ghost friend so much that they draw a picture of the ghost, tape it to the wall and pretend to have coffee with them. With so many missing friends because of the pandemic, Pirkle’s post was shared with loved ones across social media. “It gives me endorphins to know that this means something to people and that it’s making them happy,” Pirkle said. “I just want to create things that bring a smile to people’s faces.”
Amy’s Fire Flipbook
“Fire is one of the first things I learned to animate because it’s really easy!” – Amy Pirkle
Materials:
index cards (3×5 inch, blank); a pack of 100 should be enough for one book
pen/pencil/markers or colored pencils
light source (this can be a light pad/light table, a phone/tablet with a bright screen—I recommend the “Trace Table” app which costs about $1—or locking your phone on its brightest setting)
a window (great light, but the disadvantage is that you have to draw at a weird angle), make-shift light table of glass with a bright light underneath.
Helpful Tips for getting started:
Steps:
Temple Trueblood
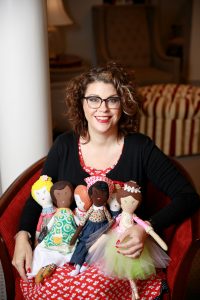
Temple Trueblood, JD ’00, claims that her mother makes Martha Stewart look like a lightweight. Growing up, she was surrounded by her mom’s painting, sewing and quilt work. Trueblood did cross stitch samplers as a kid, but it wasn’t until she was in law school at The University of Alabama that she got her first sewing machine. “Now, I make my own dresses, own a spinning wheel and have more fabric than any human being should be allowed to own,” Trueblood said.
About two years ago, she decided to do a special project with her fabric scraps, creating a doll for the first birthday of a good friend’s daughter. When her friend posted the doll on social media, Trueblood was inundated with requests to make more.
Today, when she’s not working as a civil rights lawyer, Trueblood is in her dining-room-turned-sewing-studio with her china cabinet of fabric and her vintage Singer sewing machines making cloth dolls. She does a lot of custom orders (she’s been asked to make the three sisters from “Hamilton” and the twins from “The Shining”), but comes up with a lot of doll designs herself. Over the past two years, she’s produced a variety of beautiful creations, from a ballerina with a seven-layer tutu made from upcycled silk scarves to a voodoo doll with a hot pink sugar skull dress. She currently has an idea for a crazy chicken lady.
For these projects, Trueblood usually has a vision based on a fabric. “I stand in the middle of my fabric hoard for an hour, holding swatches up next to each other until it clicks,” she said. “It’s almost meditation for me when I’m in that creative zone with fabric.”
She sometimes buys new fabric (she Googles “fabric stores nearby” when traveling for work), but Trueblood tries to upcycle as much as she can when making her dolls, and much of her stash is from discounted clothing she finds at thrift stores that might otherwise get overlooked: a blouse with a retro print and a rip on the sleeve or a cashmere sweater with moth holes. Because she only needs small pieces, Trueblood doesn’t care if they’re slightly damaged. She says men’s wool dress slacks make great coats, capes and pants, and she’s made aprons from old feed sacks.
Sewing and working with her hands are great for Trueblood, who doesn’t, “sit still well.” But she also enjoys the process of creating. “I absolutely love my job as a lawyer, but at the end of the day, the only tangible thing I make is paperwork,” she said. “So with this hobby, I enjoy having something tangible at the end of the day to show for my work. There’s just something about making something solid that’s useful or makes somebody happy.”
Temple Trueblood’s Pioneer “No-Sew” Rag Doll
Materials:
1 12×12 inch square of fabric for the body
1 5×7 inch rectangle of fabric for the apron
1 5×5 inch square of fabric for the kerchief bonnet
string/cord
cotton ball or stuffing for the head
Steps:
Kelley Freund is a freelance writer based in Newport News, Virginia.